
PyGTK CD Ripper Tutorial - Part 6
Part 1 of this pygtk tutorial stopped with a working toolbar and two place
holders. Part 2 of this tutorial extended this minimal UI with a list of
songs which was created using GTK ListView. Part 3 showed how to gain better control
on ListView. Part 4 added some final polish to the UI and added an empty Preferences
Dialog. Part 5 of this tutorial added a gtk.Notebook to the Preferences dialog, and
showed how to populate the first to Notebook pages (tabs) with the appropriate widget. This part
of the tutorial will finish populating the gtk.Notebook, by populating the "Encode" and "Advanced"
pages.
The gtk.Notebook instance was created in the create_notebook method of the Preferences dialog. To make
the code breakable and more readable, each page of the notebook was populated in a class method
with the appropriate name:
class PrefDialog():
    """
    create the preferences dialog
    """

    def set_file_names(self):
        """
        add widgets to the page File Names
        """
        ...

    def set_general_page(self):
        """
        add widgets to the page General
        """
        ....

    def insert_notebook(self):
        """
        create a notebook with 4 pages, each containing a gtk.VBox.
        """
        self.notebook = gtk.Notebook()

        for idx, page in enumerate(["General", "File Names", "Encode",
            "Advanced"]):
            # later, we can replace widget with a vbox, and then
            # the road is wide open to start packing other widgets inside it!
            vbox = gtk.VBox(False)
            self.notebook.append_page(vbox)
            # note: you could also do
            # label = gtk.Label(page)
            # self.notebook.append_page(vbox, tab_label = label)
            pg = self.notebook.get_nth_page(idx)
            self.notebook.set_tab_label_text(pg, page)

        self.set_general_page()
        self.set_file_names()
        self.set_encode()
        self.set_advanced()
        self.dialog.vbox.pack_start(self.notebook)


    def __init__(self, window):
        """
        initialize the preferences dialog
        """
        # title, parent, flags (0, for defaults), no buttons
        self.dialog = gtk.Dialog("Preferences", window, 0,
        (gtk.STOCK_CANCEL, gtk.RESPONSE_CANCEL, gtk.STOCK_OK, gtk.RESPONSE_OK))

        self.dialog.set_default_size(250, 300)

        self.insert_notebook()
        response = self.dialog.show_all()
        response = self.dialog.run()


        if response == gtk.RESPONSE_OK:
            print "The OK button was clicked"
        elif response == gtk.RESPONSE_CANCEL:
            print "The Cancel button was clicked"

        self.dialog.destroy()
The method set_general_page was broadly discussed in part 5 of this
tutorial, and the method set_file_names was left undocumented since it
introduces no new concepts. This part of the tutorial will focus mainly
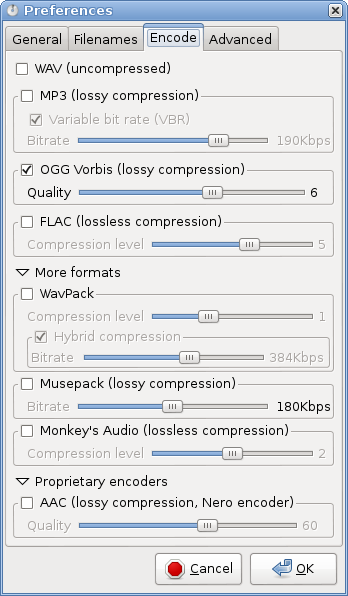
on populating the "Encode" page which includes 2 new type of widgets,
these are the gtk.Frame and gtk.Expander, which help creating the
following page:
With goals set, here is the code to generate the "Encode" page. First, in
the method we call notebook.get_nth_page(2), so other widgets
can be directly attached to pg. Introspecting pg with print type(pg)
will show that pg is a gtk.VBox widget, the output to the terminal
will be:
<type 'gtk.VBox'>
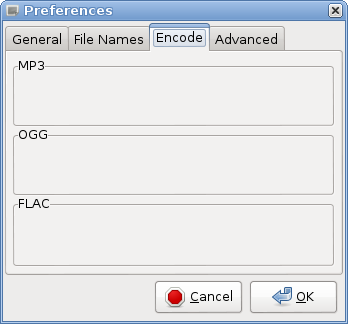
Hence, the method to create a note book page with 3 frames will look like this:
def set_encode(self):
    """
    add widgets to the page encoding
    """
    pg = self.notebook.get_nth_page(2)
    print type(pg)
    # the constractor for gtk.Frame takes a label as keyword
    mp3_frame = gtk.Frame("MP3")
    ogg_frame = gtk.Frame("OGG")
    flac_frame = gtk.Frame("FLAC")

    pg.pack_start(mp3_frame, True, True, 0)
    pg.pack_start(ogg_frame, True, True, 0)
    pg.pack_start(flac_frame, True, True, 0)
This will produce the following UI:
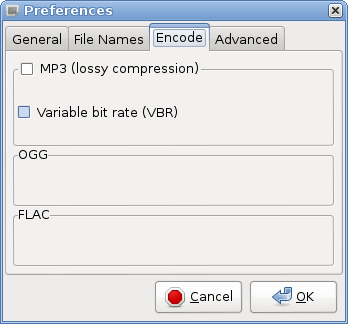
This is a good start, but the frames lack a check button, and the inner widgets.
The creation of a gtk.Checkbutton was already discussed in other parts this
pygtk tutorial:
mp3 = gtk.CheckButton(label="MP3 (lossy compression)" )
In order to include a Checkbutton inside a frame, the following method is used:
mp3_frame.set_label_widget(mp3)
Next some widgets are added inside the mp3_frame. The tricky part is that
a gtk.Frame can contain only a single widget. Hence, adding a gtk.VBox
or a gtk.HBox allows attaching mutliple widgets through packing:
    vbr_bttn = gtk.CheckButton(label="Variable bit rate (VBR)")
    vboxmp3 = gtk.VBox()
    vboxmp3.pack_start(vbr_bttn)
    mp3_frame.add(vboxmp3)
This will create the following UI:
The next 2 items in the mp3_frame are a gtk.Label and a new type of
widget called gtk.HScroll, they are packed into a gtk.HBox which is
in turn packed into the gtk.VBox created earlier:
    mp3_hbox = gtk.HBox(False,0)
    bitrate_Label = gtk.Label("Bitrate")
    bitrate_Label.set_alignment(5,0)
    # this creates a scale from 0 to 13 with increments
    # of 1, witht the default value 0.
    # the full options give in the documentation are:
    # adjustment = gtk.Adjustment(value=0, lower=0, upper=0,
                                  step_incr=0, page_incr=0,
                                               page_size=0)
    adj_mp3 = gtk.Adjustment(0, 0, 14, 1, 1, 1)
    # this will create an Horizontal Scale moveable with the above
    # Adjustment
    scroll_mp3 = gtk.HScale(adj_mp3)
    # this will set the number of significat digits after the decimal
    # point
    scroll_mp3.set_digits(0)
    # this will be the position right of the scale
    scroll_mp3.set_value_pos(gtk.POS_RIGHT)
    mp3_hbox.pack_start(bitrate_Label, False, False, 0)
    mp3_hbox.pack_start(scroll_mp3, True, True, 5)
    vboxmp3.pack_start(mp3_hbox)
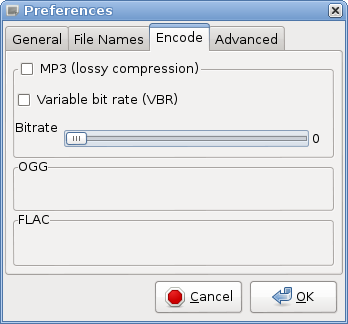
The above UI looks quit ugly. But with the help of gtk.Alignment one can
fine tune the position of the attached widgets. The Alignment widget
is used to control the alignment and size of its child:
    # alignment = gtk.Alignment(xalign=0.0, yalign=0.0, xscale=0.0, yscale=0.0)
    # alignment.set(xalign, yalign, xscale, yscale)
    # def set_padding(padding_top, padding_bottom, padding_left, padding_right)
    alignment_mp3 = gtk.Alignment(0.5, 0.5, 1, 1)
    alignment_mp3.set_padding(2, 2, 12, 2)

    # IMPORTANT:
    # Instead of adding vboxmp3 to the frame
    # mp3_frame.add(vboxmp3)
    # vboxmp3 is now added to the aligment widget, and this
    # widget is in turn added to the frame
    alignment_mp3.add(vboxmp3)
    mp3_frame.add(alignment_mp3)
The complete set_encode method is now:
def set_encode(self):
    """
    add widgets to the page encoding
    """
    pg = self.notebook.get_nth_page(2)
    pg.set_border_width(5)
    vbox_inside = gtk.VBox(False, 0)
    vbox_inside.set_border_width(5)

    mp3_frame = gtk.Frame("MP3")
    ogg_frame = gtk.Frame("OGG")
    flac_frame = gtk.Frame("FLAC")

    #MP3
    # alignment = gtk.Alignment(xalign=0.0, yalign=0.0, xscale=0.0, yscale=0.0)
    # alignment.set(xalign, yalign, xscale, yscale)
    # def set_padding(padding_top, padding_bottom, padding_left, padding_right)
    alignment_mp3 = gtk.Alignment(0.5, 0.5, 1, 1)
    alignment_mp3.set_padding(2, 2, 12, 2)
    mp3 = gtk.CheckButton(label="MP3 (lossy compression)" )
    mp3_frame.set_label_widget(mp3)
    vbr_bttn = gtk.CheckButton(label="Variable bit rate (VBR)")

    mp3_hbox = gtk.HBox(False,0)
    bitrate_Label = gtk.Label("Bitrate")
    bitrate_Label.set_alignment(5,0)
    adj_mp3 = gtk.Adjustment(0, 0, 14, 1, 1, 1)
    scroll_mp3 = gtk.HScale(adj_mp3)
    scroll_mp3.set_digits(0)

    scroll_mp3.set_value_pos(gtk.POS_RIGHT)
    mp3_hbox.pack_start(bitrate_Label, False, False, 0)
    mp3_hbox.pack_start(scroll_mp3, True, True, 5)
    vboxmp3 = gtk.VBox()
    vboxmp3.pack_start(vbr_bttn)
    vboxmp3.pack_start(mp3_hbox)
    alignment_mp3.add(vboxmp3)
    mp3_frame.add(alignment_mp3)

    pg.pack_start(mp3_frame, True, False, 0)
    pg.pack_start(ogg_frame, True, True, 0)
    pg.pack_start(flac_frame, True, True, 0)
This method will produce the following UI when called:
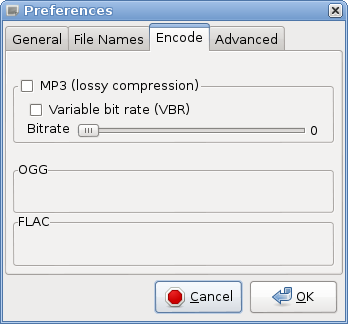
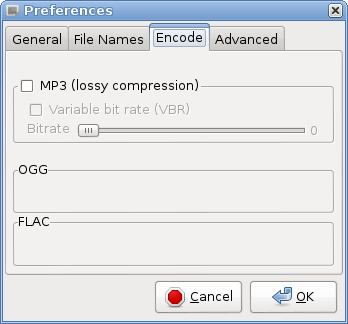
The last piece, is making the widgets in the frame appear grayed like in asunder. A grayed out application is called insensitive, hence the widget appears "grayed out" and the user can't interact with it. Also, setting these widgets to sensitive or insensitive state should be connected to the check button in the Frame's label, hence, this makes sense to do this inside a class method, since buttons can be connected to methods. Here is how this is done:
mp3.connect("toggled", self.toggle_widgets,
                       [bitrate_Label, vbr_bttn ,scroll_mp3])
When ever this button will be checked or unchecked, the following method will be called:
def toggle_widgets(self, button, widget_list):
    """
    make the widgets inside the MP3/OGG/etc Frame sensitive or
    insensitive (grayed) according to the state of
    the CheckButton
    """
    # button.get_active() returns true or false
    # when a widget is insensitive, e.g.
    # widget.set_sensitive(false)
    # it appears as gray
    for widget in widget_list:
        widget.set_sensitive(button.get_active())
After connecting the mp3 button to the method, the method toggle_widgets
is called once, so by default the widgets are insensitive:
self.toggle_widgets(mp3, [bitrate_Label, vbr_bttn ,scroll_mp3])
Hence, the coplete method set_encode is now:
def set_encode(self):
    """
    add widgets to the page encoding
    """
    pg = self.notebook.get_nth_page(2)
    pg.set_border_width(5)
    vbox_inside = gtk.VBox(False, 0)
    vbox_inside.set_border_width(5)

    mp3_frame = gtk.Frame("MP3")
    ogg_frame = gtk.Frame("OGG")
    flac_frame = gtk.Frame("FLAC")

    #MP3
    # alignment = gtk.Alignment(xalign=0.0, yalign=0.0, xscale=0.0, yscale=0.0)
    # alignment.set(xalign, yalign, xscale, yscale)
    # def set_padding(padding_top, padding_bottom, padding_left, padding_right)
    alignment_mp3 = gtk.Alignment(0.5, 0.5, 1, 1)
    alignment_mp3.set_padding(2, 2, 12, 2)
    mp3 = gtk.CheckButton(label="MP3 (lossy compression)" )
    mp3_frame.set_label_widget(mp3)
    vbr_bttn = gtk.CheckButton(label="Variable bit rate (VBR)")

    mp3_hbox = gtk.HBox(False,0)
    bitrate_Label = gtk.Label("Bitrate")
    bitrate_Label.set_alignment(5,0)
    adj_mp3 = gtk.Adjustment(0, 0, 14, 1, 1, 1)
    scroll_mp3 = gtk.HScale(adj_mp3)
    scroll_mp3.set_digits(0)

    # connect mp3 to some function
    mp3.connect("toggled", self.toggle_widgets, [bitrate_Label, vbr_bttn ,scroll_mp3])
    # this will make the widgets insensitive
    self.toggle_widgets(mp3, [bitrate_Label, vbr_bttn ,scroll_mp3])

    scroll_mp3.set_value_pos(gtk.POS_RIGHT)
    mp3_hbox.pack_start(bitrate_Label, False, False, 0)
    mp3_hbox.pack_start(scroll_mp3, True, True, 5)
    vboxmp3 = gtk.VBox()
    vboxmp3.pack_start(vbr_bttn)
    vboxmp3.pack_start(mp3_hbox)
    alignment_mp3.add(vboxmp3)
    mp3_frame.add(alignment_mp3)
This will produce the following UI's:

The same methodology has to be repeated for each of the frames. With the
special case of the frames which are hidden by expanders, and especially
the frame for WavPack which includes a frame inside a frame. Here is how
a gtk.Expander and frame inside a frame are created:
expander = gtk.Expander(label="More formats")
much like gtk.Frame a gtk.Expander can contain only one child widget,
a gtk.Vbox added to it, allows packing multiple widgets:
    expander = gtk.Expander(label="More formats")

    wv_pk_frame = gtk.Frame("WavPack")
    hybrid_frame = gtk.Frame("Hybrid")
    vbox_wv_pk = gtk.VBox()
    wv_pk_frame.add(vbox_wv_pk)

    hybrid_hbox = gtk.HBox(False,0)
    hybrid_frame.add(hybrid_hbox)
    vbox_wv_pk.pack_start(hybrid_frame,True, True, 5)

    # add both frames to expander packed inside VBox
    vbox_in_expander = gtk.VBox(False)
    # wv_pk_frame has already the hybrid frame include
    # inside gtk.HBox, so other widgets can be attached to it.
    vbox_in_expander.pack_start(wv_pk_frame, False, True, 0)
    expander.add(vbox_in_expander)
The following addition of the code yield the following UI:

With the same methodology as before, it is quite easy to add all the necessary
widgets to the WavPack frame. Also, adding a second expander is not
complicated either. The next page in the notebook, the "Advanced" page,
includes only familiar gtk.Widgets that were discussed in other parts
of this pygtk tutorial and therefore, the creation of this page will not
be thoroughly discussed.
The full code of this With the UI of the Preferences dialog can be found
in here.
The next parts of this tutorial will show how to add symbols to the window,
and will demonstrate how to save the configuration options to a configuration file.
Also, since the UI is almost complete, it would be quite nice to have some keyboard
shortcuts and maybe even translation to other languages. So, stay tuned.
Share this post: